

How To Changurl Of Your Wordpress Bloge The
Simple Guide to Changing Your Permalinks Without Breaking Your WordPress Site
Last updated on:
Changing the permalink structure on your website is a major undertaking. You should be absolutely sure you want to make this change to your site because it can potentially have an impact on your SEO (and can cause a lot of errors and broken links if not handled correctly).
Each page and post on your blog has a unique permanent URL, or 'permalink', assigned to it. These permalinks are created using a predetermined structure. Changing the link structure for your posts is sometimes necessary, but can cause issues with search rankings, outdated links from external sites, and broken internal links within your own content.
The best way to avoid these issues with your links is to have a clear plan for updating them before you do so. Then, you can make the switch safely and start benefiting from a more optimized permalink structure. In addition, you'll want to know how to best implement redirects, in order to avoid 404 errors.
In this post, we'll discuss what permalinks are and talk about the reasons for changing them on your site. We'll also provide instructions on how to safely alter permalink structure, and avoid external and internal errors from broken links with the use of redirects. Let's dive in!
What Are Permalinks?
A permalink is the part of a web address that follows the domain name. For example, take a look at the URL for this blog post:https://www.wpexplorer.com/break-into-blogging-niche/. The domain name is wpexplorer.com, and the permalink is break-into-blogging-niche.
Permalinks, when set correctly, serve several important purposes. For example:
- They allow your readers to get a brief understanding of what your post or page is about without looking at the content.
- They are used by search engines to discover the post or page topic solely from the URL.
- They also supply a permanent location for your visitors and search engines to return to in order to read your content.
- They are essentially a unique identifier for each piece of content you create, helping you keep everything organized.
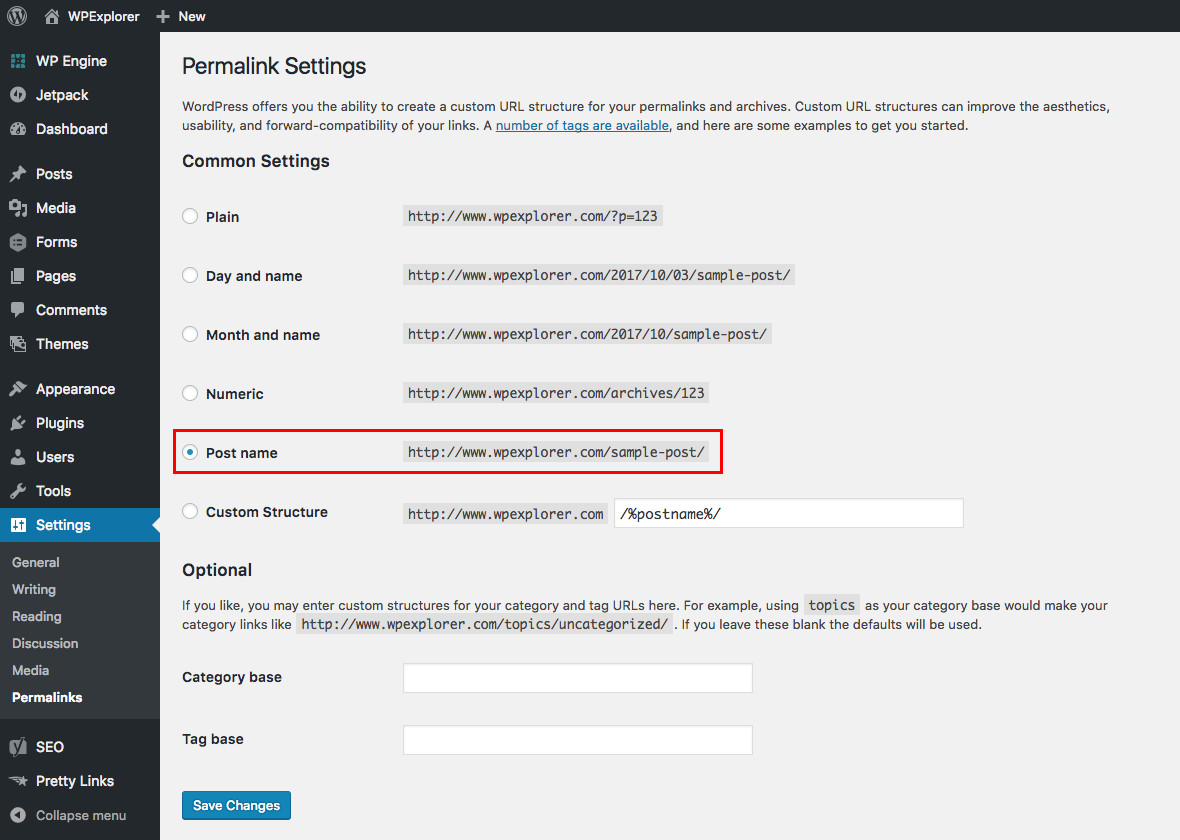
To set the structure for your permalinks in WordPress, you would need to go to Settings > Permalinks in your dashboard. By default, WordPress permalinks use the Day and name option. If your focus is more on the content of the post than the date it was posted, however, it's often best to use the Post name option. This structure makes the focus of your post clear to both readers and search engines.
Most people will change the default permalink structure of their WordPress blog at its creation. There are several options to choose from, but the most common two choices are the structure that shows the date followed by the post name or simply the post name on its own. This choice is usually made with the intended content in mind. For example, websites that focus on news items tend to have the date as part of the permalink structure.
You would think that since it is easy to change the permalink structure at the creation of a website it should also be a simple process for an established website. While the act of making the change is as simple as selecting a new permalink type and clicking save, the consequences of that action require a little more discussion.
Why Change Permalink Structure?
There are several reasons why you would consider changing your permalink structure, especially if you have been using the default setting. Changing your permalinks, whether on a new site or an established one, is relatively simple. However, making changes to the structure on an established site can have negative consequences, if you don't plan ahead. Therefore, you should carefully consider whether or not it is necessary to alter your permalink structure.
However, there are several valid reasons for making the switch. Here are just a few:
- If you started with an older version of WordPress you may still be using the previous default structure, which includes the Post ID. This structure provides no useful information about your content, and is worthless for SEO.
- You may be taking your site in a different direction, and need to update the structure to reflect that change. For instance, if you are moving to a more news-oriented site, you might want to include the date in your permalinks.
- Many people buy established websites as an investment, so it's possible that you have purchased or inherited your site from someone else. If you have taken ownership of a live site, you may want to update the link structure for re-branding purposes.
If your current structure works for your content and brand, changing it could be an unnecessary headache. However, if you do decide that you need to update your link structure, you'll be glad to know there are ways to implement this switch safely.
How To Safely Change The Permalink Structure

Before you make any changes to your site's link structure, it's important to make a backup of your site just in case. It's also smart to test your changes on a staging site before you implement them on your live site, so you can troubleshoot any issues that may arise.
If you've decided that you do want or have to change your permalink structure, you'll need to take a few steps.
Step 1: Decide on a New Permalink Structure
The first decision you need to make is the syntax of your new permalink structure. When choosing a new structure you need to make some decisions about what you will include in the syntax of the link. Do you want to include a date, for example? If you do, how much of it do you want visible within the link?
It is an important decision and you shouldn't make any changes at all until you have made absolutely sure of your choice. You can get some ideas for your new structure from WordPress's guide to using permalinks. In general, the Post name option is ideal for most users, although news-related sites may want to include dates. Either way, once you decide on your new structure, it's time to actually make the changes to your permalinks.
Step 2: Change Your Permalink Structure in WordPress
Once you know which syntax you are going to use, it is time to go into the Permalinks menu of your dashboard and make the change. Simply navigate to Settings > Permalinks in your WordPress back end, and make your selection from the settings screen:
Once you make your selection (or used tags to create your own custom structure instead), click onSave. Your permalinks are now updated! This will now update all of your internal URLs with the new syntax.
All of the internal links should update correctly if they have been added as part of WordPress. Any manual links may need to be updated. However, all links to your site from elsewhere will now be completely broken and all the content indexed by search engines will be incorrect.
Step 3: Fix Broken Links With 301 Redirects
As we noted earlier, changing the structure of your permalinks is the easy part. Now, however, you have to deal with the fallout. Every reference to your prior links, whether within your content or on external sites, is now broken. Another side effect is that any content that has been indexed by search engines is also incorrect.
There is a simple solution to this problem and that is to setup 301 redirects on your website. A 301 redirect essentially tells any browser that comes to your site using an old permalink structured URL where the relevant content is. It also lets search engines know that this is a permanent change. You'll probably also want to customize your 404 page as well to catch any broken internal or manual links that you may have overlooked.
In the past you would have been required to add all of these redirects manually to your .htaccess file on your web server. Thankfully, with WordPress there are plugins that can take care of all of these things for you.
Using the Simple 301 Redirects Plugin
To easily create the redirects on your WordPress one option is the Simple 301 Redirects plugin. Once you have installed and activated the plugin it adds a new menu to the Settings area of your dashboard.

There really isn't a great deal to worry about with this plugin. In the 301 Redirects settings window you are shown two simple fields. One is labeled Request and the other Destination. This is basically where you enter the old permalink structure and the new permalink structure. You only need to add the information after your domain name to these fields.
In the example in the image above, the Request field is the WordPress configuration for the Month and Name permalinks while the Destination field is the WordPress configuration for the Post name permalink structure. Once you have added these two fields, save the changes. This will now tell any search engine traffic that comes into the old links where to go.
Using the Redirection Plugin
Another plugin we'd recommend for adding and managing your redirects is the free Redirection plugin.
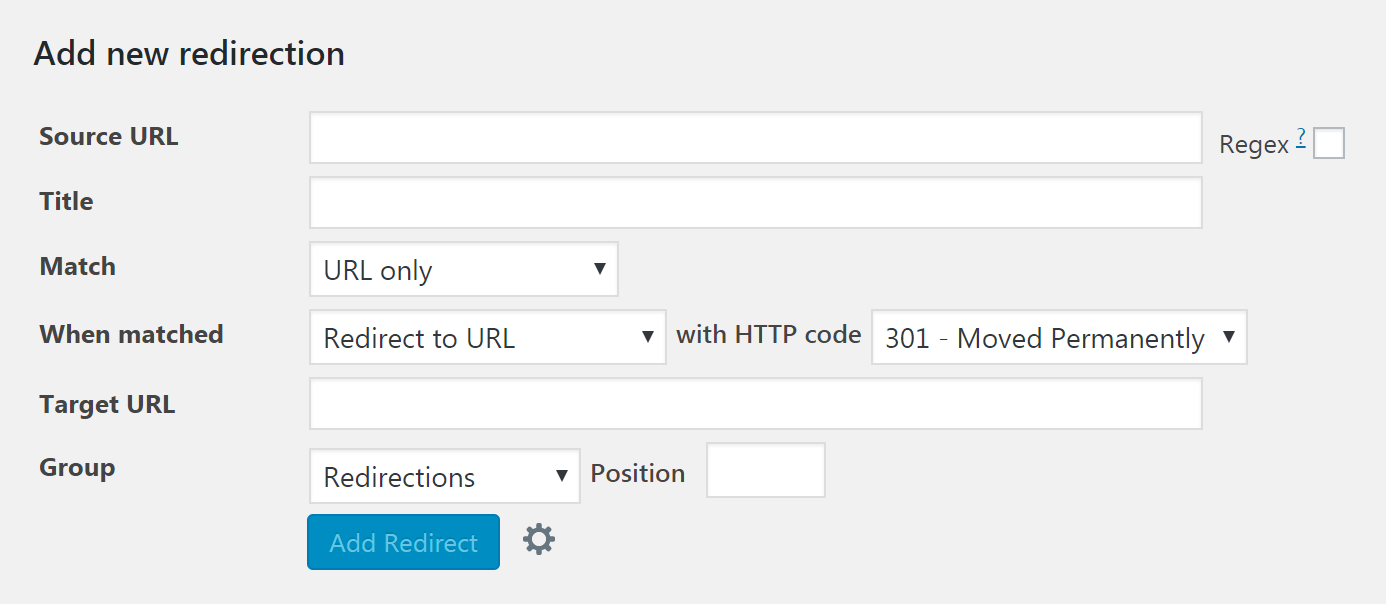
To use Redirection, first install it on your WordPress dashboard. Then you can navigate to Tools > Redirections to point the pages and posts on your site to their new links. Simply enter the old permalink into the Source URL field, and the new permalink into theTarget URL field, and then click Save:
Using the Yoast SEO Permalink Helper Tool (to redirect to /&postname%/)
Another tool that you may find useful is the Yoast SEO Permalink Helper Tool. This generates a code based on your current link structure, which you can manually add to your site's .htaccess file to redirect all the posts safely to the new /%postname%/ structure. Of course this is a very handy tool but it only gives you the code to redirect the the postname structure while the plugin recommended above can be used to redirect multiple cases to various destinations.
If you are not comfortable with modifying your site's files, however, we recommend you stick with one of the two free plugins mentioned above.
Step 4: Changing Search Engine Links to the New Structure (Re-indexing)
We mentioned earlier that search engines will have incorrect information after you update your permalinks structure. Unfortunately, this is beyond your control as a site owner. Search engines regularly crawl sites and will update when they find changes, so this problem will correct itself over time.
You can, however help the process along by creating an XML Sitemap, and then manually re-indexing your site with search engines.
Conclusion
It is always best to address elements like permalinks before you launch a new site. However, you might still need to change your link structure after your site has launched. If you find yourself in this situation, you need a careful plan to avoid disruption to your site (both internally and externally).
Changing the permalink structure of your website is something that should be considered and planned before you do anything.
While making the change and limiting the problems has never been easier, you may still take an SEO hit to your site. That may be fine in the short term if you are changing to a more SEO friendly permalink structure, but it isn't something you want to have to continually deal with. Pick your new permalink structure and stick with it.
Do you have any questions about updating your WordPress permalink structure? Have you undertaken the permalink change in the past? Did you experience any problems with search engine traffic and broken links? How did you resolve them? We'd love to hear from you in the comments below.
How To Changurl Of Your Wordpress Bloge The
Source: https://www.wpexplorer.com/change-permalinks-wordpress/
Posted by: friskhicess.blogspot.com
0 Response to "How To Changurl Of Your Wordpress Bloge The"
Post a Comment